Categories
Uncategorized

CNC Machine Capabilities

MAY 16, 2023

Wood is a fan-favorite substrate when it comes to cutting and carving with the CNC Machine. See an image below to see how far we take the levels of creativity when it comest to CNC Circles!

A light box like no other: images printed on plexi, encased with a CNC circle cut-out frame, with a light box touch to make it especially spectacular.

Our second project in our CNC Wood Working resume is this wavy wall sculpture we planned, created, cut, and installed in house. It sits beautifully in an office at our very own store!

That’s all for this week!

We’ll catch ya’ next time. Until then, remember to always be limitless. Love,

FrameWorks.

5/5
Categories
Uncategorized

Headboards, Gallery Walls, Accessories, Oh My!

May 8th, 2023

In the world of FrameWorks, the possibilities are limitless. Light boxes are one of our favorite crafting creations, so when we were given a proposal to turn a light box into a headboard, we were ecstatic. 

After selecting the perfect images, our graphic design team got to work. Using extensive editing, our team managed to transform all the selected images to contain similar color and tone through PhotoShop. The shade of the images were precisely edited to compliment the color of the wooden frame that will encase them. This resulted in warm, neutral tones that closely related to the tones of the wood. 

As seen below, choosing an orange glow as the light to enhance the plexi of the light boxes was chosen to withhold a warm, gentle ambiance for the room. 

Interior designers’ jobs are to build an ambiance and make you feel welcome and comfortable when entering a room. Not only are the results of the headboards stunning, they also enhance the room and make it incredibly warm and welcoming.  

Intentional decisions such as the colors of the walls, stain of the wood on the furniture, lamp selections, and so much more go into designing a space. Would you sleep here?

In addition to the headboard, we were given the opportunity to frame other art pieces to further enforce the ambiance. Meek gallery walls only containing three to four frames per gallery were then strategically designed and situated to match the wood of the ceiling panels and windows. Charming dark wood welcomes you, along with the still life and mildly abstract images of nature. 

Take a look!

Our final mission in this project took flight and finally arrived at their final destination. You may not be able to tell, but the headboard decorations here are curated ceramic birds. Another FrameWorks convenience is our management of accessories. Along with framing and printing, we order and organize accessories for your spaces. Such as these birds, which now sit beautifully atop a headboard. 

That’s all for this week!

We’ll catch ya’ next time. Until then, remember to always be limitless. Love,

FrameWorks.

5/5

                                                                    New blog posts every week! Starting May 8th.

Categories
Uncategorized

2023 FrameWorks’ Art Trends Report

FRAMEWORKS' 2023 ART TRENDS REPORT

Every day, our team of creatives, craftsmen, and craftswomen work alongside designers to bring art installations from idea to reality. There’s an art and science to what we do: Mood boards and tape measures, color swatches, and CAD renderings. If you were a bug on our wall (which in South Florida isn’t a stretch of the imagination), you’d probably hear us say on repeat, “What if…?”

A few years ago, one of these “what if” conversations helped us realize that our team has access to and reviews a high volume of art across mediums, spaces and styles daily. “What if we shared what we are seeing in the market?” we thought! And from there, we launched the FrameWorks Annual Art Trends Report.

VINTAGE IS COOL

Screen Shot 2023-05-03 at 12.26.07 PM
IMG_9889

THE ART IS IN THE WALLS

DARK VS LIGHT

highres1

NAVY IS IN

COLOR IS YOUR FRIEND

GOLDEN HOUR

Cotton Bay Village - Piano Piano004[1]
LESABLONS INSTALL 2

OH MY WOODNESS

restaurant-interior
cranes
Categories
Uncategorized

Teamwork Makes the Dream Work

Author: Cris Sweeny
Published: 08/01/2022

De Moya Foundation Partnership Campaign

Teamwork Makes the Dream Work

Did you know? Our co-Founder Cris knew at a young age when she started her future company that it would be a beacon of diversity and inclusion, a place where the world could look in and see what is possible. Thirty-six employees later, she and Claire have created that space right in the FrameWorks’ workroom. And beyond…
Finding a kindred visionary spirit in the community, Cris and Claire have established a lasting relationship with de Moya Foundation, a non-profit organization that is committed to creating employment opportunities for young adults with unique abilities. As partners and advocates, FrameWorks and de Moya have worked together to offer belonging and job opportunities in the workroom to three team members and their job coaches.
Prior to de Moya, FrameWorks did not have this specially abled representation on the team and knew it would benefit everyone involved. Joey has been with FrameWorks for 1.5 years, Katie more recently, and just last week, the growing team welcomed Marty. Having these three individuals join FrameWorks embodies just how much Cris and Claire believe “the world changes in small little steps.”
For their most recent collaboration, de Moya asked the FrameWorks team if they would like to join them in participating in the Special Olympics for 2022. They quickly said “yes” and were paired with young adults on the Olympics team. FrameWorks members traveled to Orlando and supported #TeamdeMoya at the State Finals!
Teamwork really does make the dream work and we are honored to have a partner like de Moya who values diversity and inclusion as much as we do. Happy International Day of Friendship!
Categories
Uncategorized

Come Fly with FrameWorks

Author: Cris Sweeny
Published: 07/22/2022

Come Fly with FrameWorks (Let’s Fly, Fly Away!)

That’s right, we did an airport hotel project we teased on our Instagram account (follow us @frameworksmiami!). And we have all the travel vibes this summer!
Long-time FrameWorks client Jackie Arena Interiors (JAI) reached out to us with a challenge. Of course, we said “yes” immediately. And then we paused to hear more about the project. At FrameWorks, we want our clients to look fantastic in front of their clients. In this case, JAI’s client was a second-generation hotel owner whose taste and style were very different from his father’s. Whereas his father preferred painted murals, his son envisioned a more modern, sleek, and sophisticated aesthetic. The space he wanted to tackle next? A multi-story alcove in the lobby of the Hampton Inn & Suites Miami Airport South. The kicker? The alcove was only 6” deep.
JAI excels at vision and came to us with renderings but their team wasn’t quite sure how to execute or if it was even possible to bring the design to life. Our team is stellar at transforming an idea or challenge into a feasible solution. And that is precisely what we did! We went to the drawing board and brainstormed materials, finishes, lighting and more. Our team, led by Claire and Myron, designed 3 options incorporating both wood and lighting at 3 price points. We delivered the art package in a presentation-ready format for JAI to present to the hotelier. An option was selected and we went back to work refining the design to his liking, always up for a challenge.
The result? A fully custom alcove-inlaid sculpture for guests to enjoy on the way through our great city of Miami! We manufactured all the slats in-house- cutting, sanding and finishing each piece by hand. The slats were laid in such a way to capture waves of shadows with the hidden LED lighting elements. We also created a custom modular hanging system and trouble-shooted the installation in our own workroom! Take a look at our process shots and the final work of art.
Everyone Likes A Good Before Photo
Work in Progress in the Workroom
Installation Day at the Hotel
Completion!
The New, Guest-friendly Focal Point
Categories
Uncategorized

From Concept to Crate: Introducing Frameworks + Prima

Author: Cris Sweeny
Published: 07/07/2022

From Concept to Crate: Introducing Frameworks + Prima

If you have spent any amount of time with our co-founders, Cris and Claire, you have certainly heard them say that FrameWorks does everything, from “concept to crate.” This couldn’t be more true aboard Norwegian Cruise Line’s recently unveiled luxury vessel, Prima! FrameWorks filled the vessel’s staterooms, suites and public spaces with interest and visual creativity, printing and framing over 2000 pieces of replicated artwork and sourcing over 8000 books. One particular printing application, floor-to-ceiling replicated originals of international artist Amy Rader’s collaged commissions, garnered significant industry attention! What started as a spark of an idea for Claire at BDNY 2018 became an IMO-certified application never before seen in the industry. We featured this innovation onboard Prima in our recent CSIE feature story. Read it here!
Categories
Uncategorized

What We See & What We Love: FrameWorks’ Spring 2022 Art Trends Report

Author: Cris Sweeny
Published: 05/16/2022

FrameWorks’ 2023 Art Trends Report

Every day, our team of creatives, craftsmen, and craftswomen work alongside designers to bring art installations from idea to reality. There’s an art and science to what we do: Mood boards and tape measures, color swatches, and CAD renderings. If you were a bug on our wall (which in South Florida isn’t a stretch of the imagination), you’d probably hear us say on repeat, “What if…?”
A few years ago, one of these “what if” conversations helped us realize that our team has access to and reviews a high volume of art across mediums, spaces and styles daily. “What if we shared what we are seeing in the market?” we thought! And from there, we launched the FrameWorks Quarterly Art Trends Report.

In our latest report, we note a return of vintage frames and a selection of other rather unconventional colors and mediums that might surprise you this season! See more color and material trend visuals in our report available here:

vintage is cool

THE ART IS THE WALLS

DOUBLE IT

ABOVE & BEYOND

NAVY IS IN

LOOKS LIKE A PAINTING, BUT IT'S A PRINT

EMBRACE COLOR

KEEP IT COOL

GOLDEN HOUR

OH MY WOODNESS

Categories
Uncategorized

13 CREATIVE PICTURE FRAMING IDEAS TO ELEVATE YOUR HOME DECOR

Author: Cris Sweeny

13 CREATIVE PICTURE FRAMING IDEAS TO ELEVATE YOUR HOME DECOR

Elevate your interior ambiance with these inexpensive DIY ideas

What’s the first step in selecting the right picture frame ideas for your home decor?
Answer: ensuring the frame suits the photo. For example, you wouldn’t mount your wedding photos with a Mickey Mouse frame. That is unless you and your spouse looooove Disney!
The next step is to see that framing is creative and makes an inspired addition to your living space. It should fit with and, hopefully, enhance the photos you’re displaying.
Whenever looking to elevate the character of your interior decor, don’t be afraid to get creative! The best interior decor is a bit rogue … it has a touch of the inspired.

To create that perfect ambiance, set out to blend textures, colors, and shapes. All these design elements will merge to communicate your personality as well as the heartfelt significance of your memories.

How can you actually use this?

Here are 13 creative picture framing ideas that will instantly bump up the atmosphere in your living space. And what’s great is that most are low cost and DIY! All of these ideas will help you feel more at home than ever.

#1 Make DIY Wooden Picture Frames

Photo Credit from Minimalisti

Here’s a home decor idea giving you free reign on creativity.


Create your style by choosing any type of wood – distressed paneling from old fence posts or doors, stained cuts from your hardware store or natural pieces – whatever suits your design motif.


If you have an abundance of one style of wood, arrange a gallery of multiple frames made from the same material. This allows you to share a continuous storyline while maintaining a shabby-chic look.

#2 Make DIY Map Picture Frames

Oh, the places you’ll go!


I’m a huge fan of pasting maps around travel photos because it neatly emphasizes the places traveled. Plus, it’s a reminder to get back out there and see more sights!


Simply cut your chosen map into strips, being aware of preserving areas that will hug a corner. Then attach to a smooth frame with rubber cement or Mod Podge.


Now your home decor has a touch of geographic flavor!


That’s not all.

#3 Frame Pictures With Clothespins

Photo credit Pinterest from Barefoot Katie Blog

This decor idea adds a bit of rustic charm and vintage appeal to your memories. Simply clip your Polaroids together in a line or hang them in columns to showcase a sequence of experiences.


This is a great opportunity to use an unconventional picture frame idea. For example, distressed shutters or an antique picture frame.


Or you can DIY your photo frame by visiting your local hardware store. Ask to take an old palette off their hands and they should be happy to assist. All you’ll need to do is sand the wood, add a few nails and maybe a coat of stain if you’re feeling fancy.

#4 Hang Pictures From a Tree Branch

Photo credit from Pinterest Indulgy.com

Dangling photo frames from a mounted tree branch brings a soothing, unconventional element to any room. This home decorating idea wins by radiating both natures, nostalgia, and relaxation into your living space.


You’ll want to affix the frames to the wall underneath the branch and the idea is to arrange your photo frame at different heights to fill out your wall space. Extra points for painting the wood and getting vivid with your colorways.


Fun stuff!

#5 Framed Wallpaper Panels

Photo credit from Home Edit

I am all about patterns!


Framing up printed wallpapers or fabrics is my favorite way to add variety to any room. This picture framing  idea excels in adding a healthy dose of visual interest to a space without dedicating to wallpaper or a new paint job. This is a great home decor idea for adding structure and vibrancy to any room.


Paint the frames the same color as your wall to lend the effect of molding panels. For a handy tutorial to make moldings fast and easy, check out DIYer and decorating blogger Kim Sisal at her blog here.

#6 Frame Pictures on Painted Mason Jars

Photo credit A Little Craft in Your Day

Mason jars are so hot right now!


Involve this style trend into your home decor by pasting photos to them and painting around them. Adorn with flowers and vóila! A handheld picture frame colorfully repurposed to share your most precious memories.


If you loved this idea, wait for the next one!

#7 Frame Pictures With Old Books

Photo credit from DIY Joy

Easy recipe for a smart, antiquey framing solution:


  • One part old, hardcover books
  • Equal parts photos you’d love to frame (but can’t quite figure out how)
  • Combine together for a fun, upcycle DIY project


The stylish results are sure to impress while keeping your decorating budget low. You don’t have any antique books laying around? No problem. Visit your local library’s book sale section. It’s sure to be filled with classic titles ready to be repurposed.

#8 Frame Pictures in a Gallery Wall

Photo credit from Europe Fail

However you want to arrange them, gallery walls are 100 percent personality and make a unique statement anywhere. Feel free to paint around your picture frames to add additional texture to the wall space.


To make a cohesive gallery, determine a color scheme and a theme, and remember, don’t go wild with too many frame shapes or shades in a picture. Try to keep your arrangement complementary – and every now again you can add a unique element.


DIY blogger and interior designer CentsationalGirl suggests keeping your gallery minimal, even framing solely in black and white for best effect.


If you don’t think how every picture and frame will sit next to another, you’ll end up with a scattershot!


Why does this matter?


Take time to lay out your interior design for best results.

#9 Frame Your Picture Frames

Photo Credit from Nancy Meadows Design

Totally meta, I know. But it’s really cool.


Framing your frames is an awesome home decorating technique leaving ample room for creativity and it works in any space.


Use a gallery wall to display a collage with a variety of pieces. With this, you can strongly emphasize the color scheme and your creativity while developing a bold theme on the wall.


There are no limits on this interior decór idea because you can reframe anything you want.

#10 Frame Pictures With Logs

Perfect for autumn or anyplace you’re looking to add a spot of natural charm, this picture framing idea comes from craft maven Diane Henkler and her blog, In My Own Style.


The best part.


To do as Diane does, grab a simple $1 frame and sandwich the base between two symmetrical wood ends. Then glue all three pieces together at the bottom of the frame.


Diane even recommends a sepia tint to the photo for extra personality.

#11 Make a Monogram Picture Frame

I’m into monogram picture frames because they’re personal, super cute, and showcase lots of photos. Additionally, they’re sentimental, novel and may be made into any size.


Get your wood or fiberboard cut to shape and then paste photos onto every surface!


For a tutorial on how to make your monograms, check out Rhoda from Atlanta’s DIY craft blog, SouthernHospitalityBlog.

#12 Paint Chevrons on Your Picture Frame

Another design trend that’s easily made custom for your home decor is diagonal stripes, or chevrons, a simple and fun way to add pizzazz to any picture frame.


Bottom line.


All you need for this is painter’s tape, paint, and a basic frame. Start by interlocking tape across itself in diagonal waves to create your lines. Once you’ve completed the tape job, apply the color you want over top. After your paint is dried, you may want to re-tape over the part you’ve just done to create a completely custom colorway on the frame.


If you want, place this frame with an extra backing to make the design really pop out.

#13 Make a Scrabble Piece Picture Frame

Photo Credit from DIY Joy

Blend the verbal and the visual with a DIY Scrabble tile picture frame.


If you have a strong bond to family game night or simply would like to add some playfulness to your images, integrating these wooden blocks is a solid choice.


How you arrange the letters will make the picture special, so get creative with rearranging words and phrases around your favorite pictures. I also recommend going with an earth tone frame and backdrop to make the picture look best.


Oh, and don’t hesitate to tint or filter the photo color toward sepia so everything matches just so!

Now It’s Your Turn!

When you set out to create and install your any of these picture framing ideas, your first step is matching your frame to the space. Frames are always subject to the picture they’re framing, like an accomplice in a sidecar. They have to work together. Next, make sure your framing choice complements the photograph you’re displaying. By paying close attention to how shapes, textures, and colors come together, you’ll ultimately be able to decide which style you choose. And be sure to choose a design theme appropriate to the image. Now all that’s left to do is pick and place – enjoy!

Cris Sweeny

FrameWorks

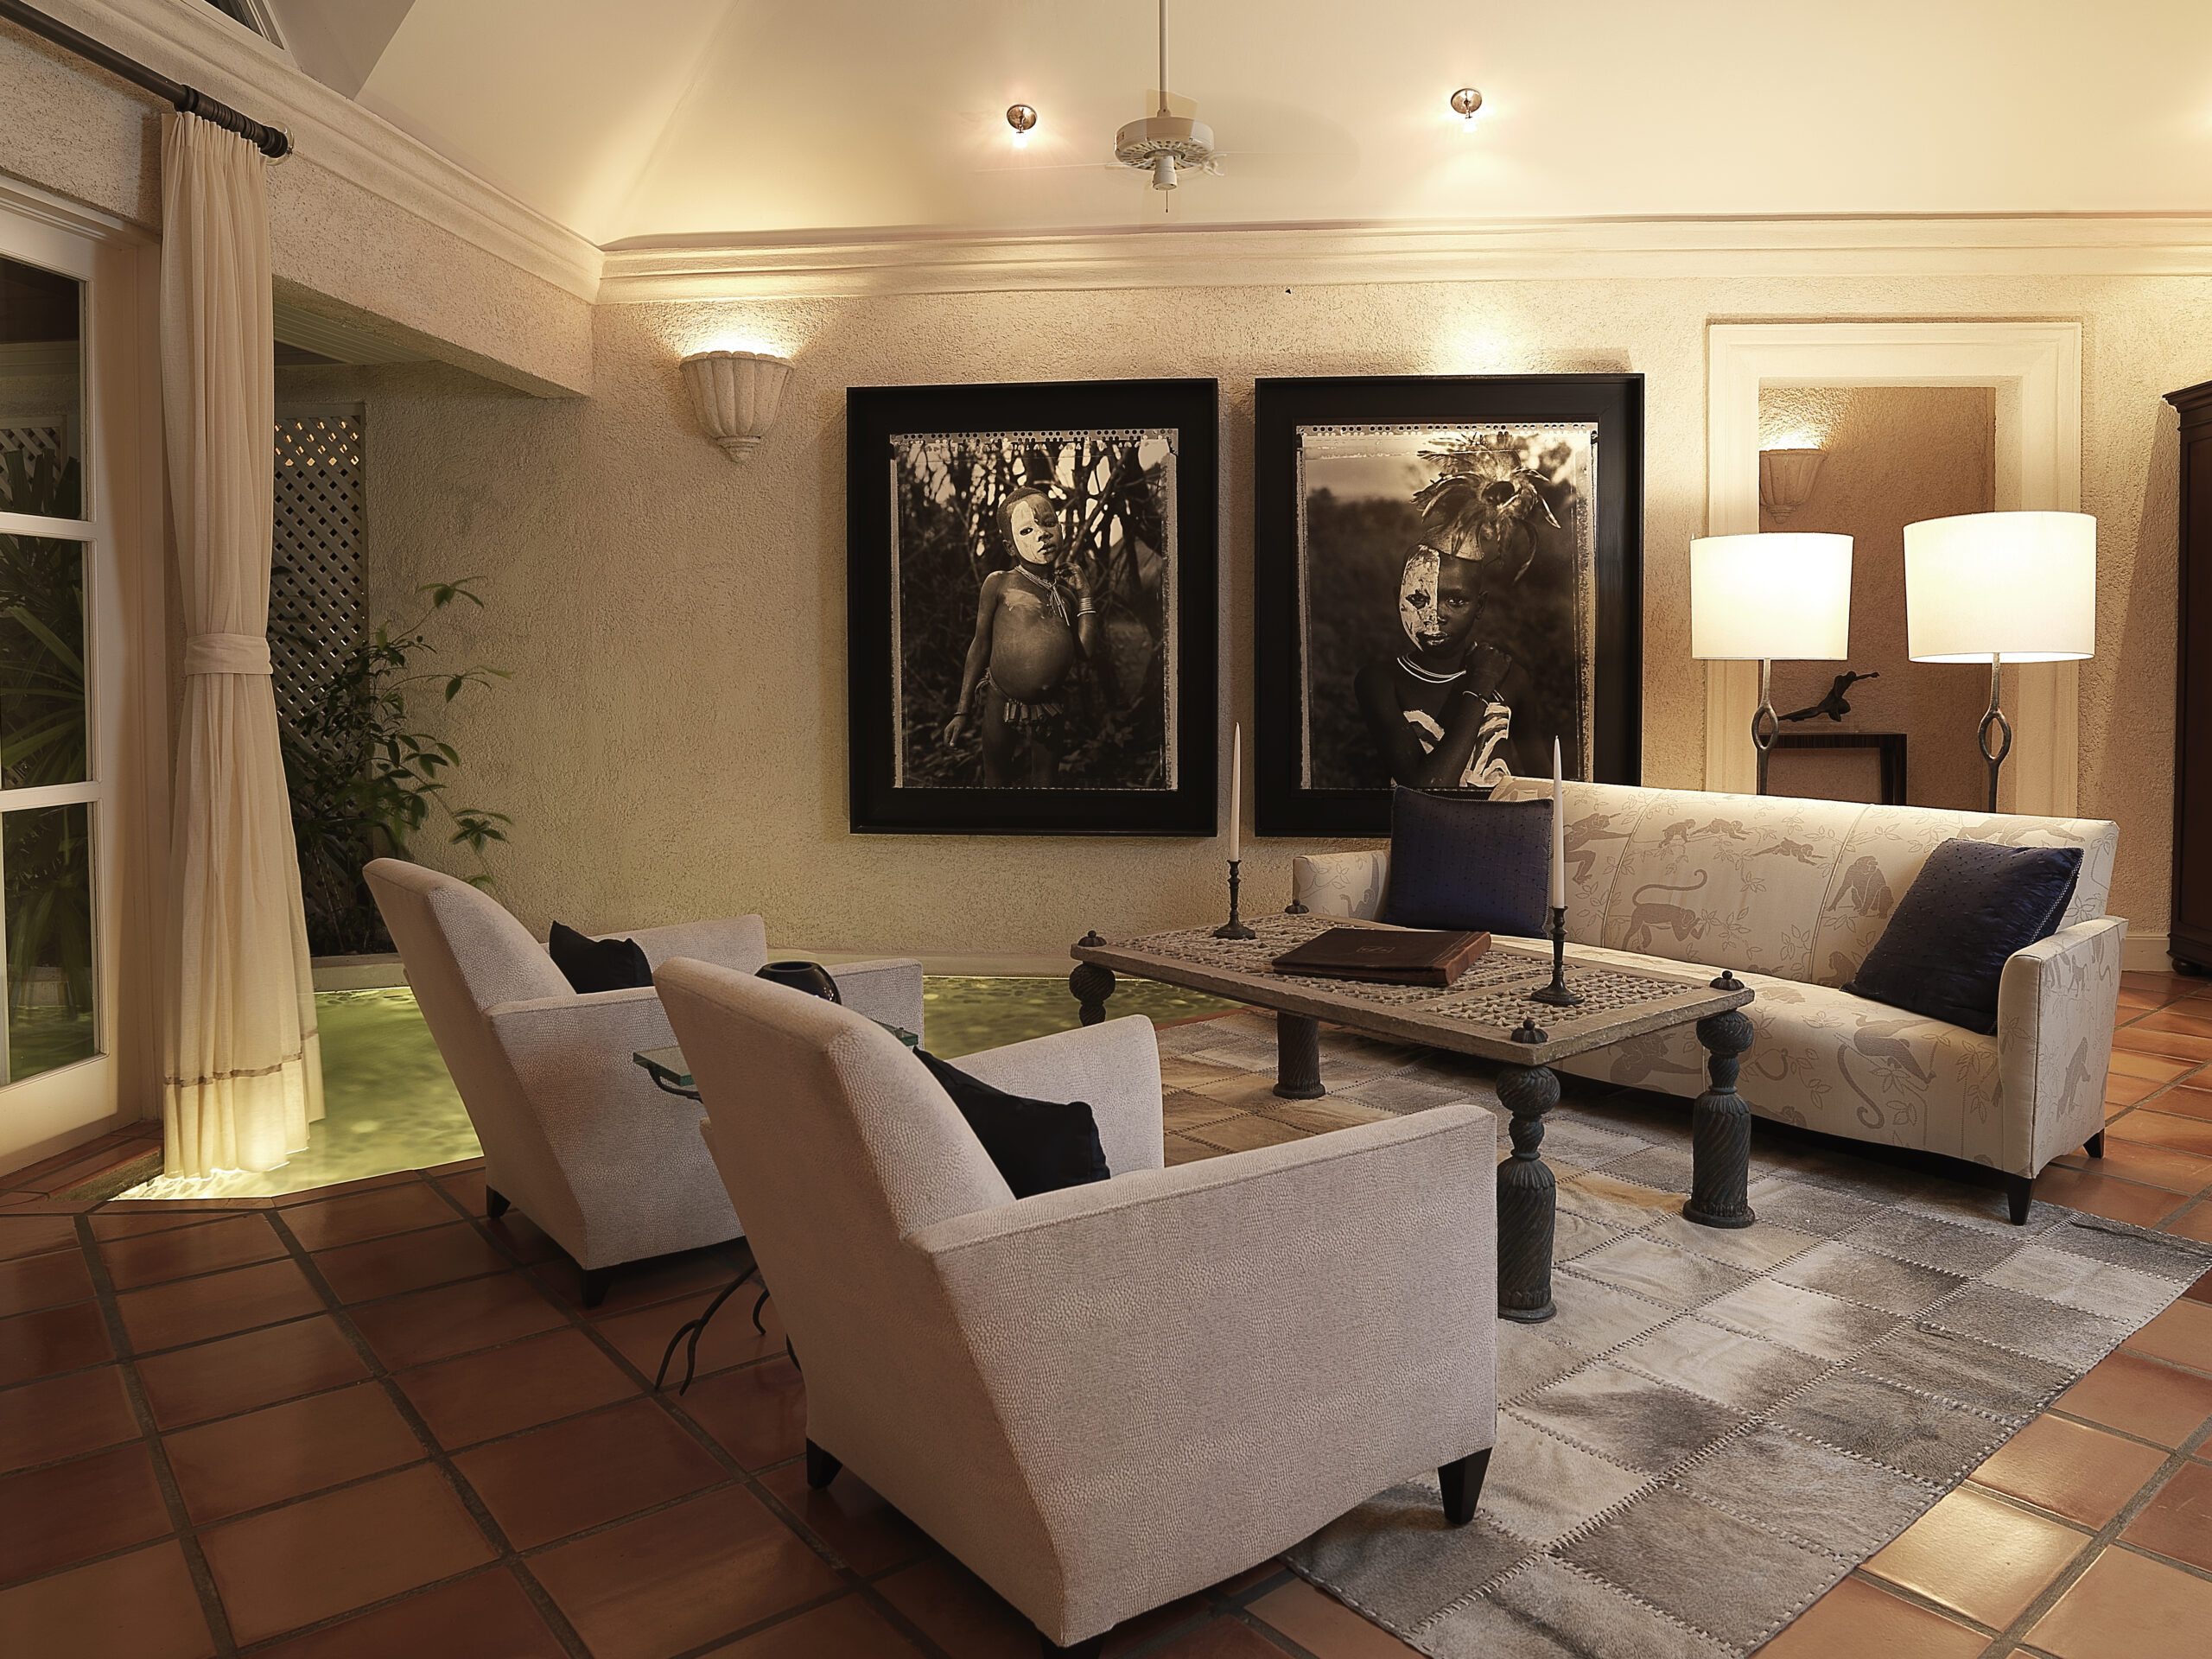
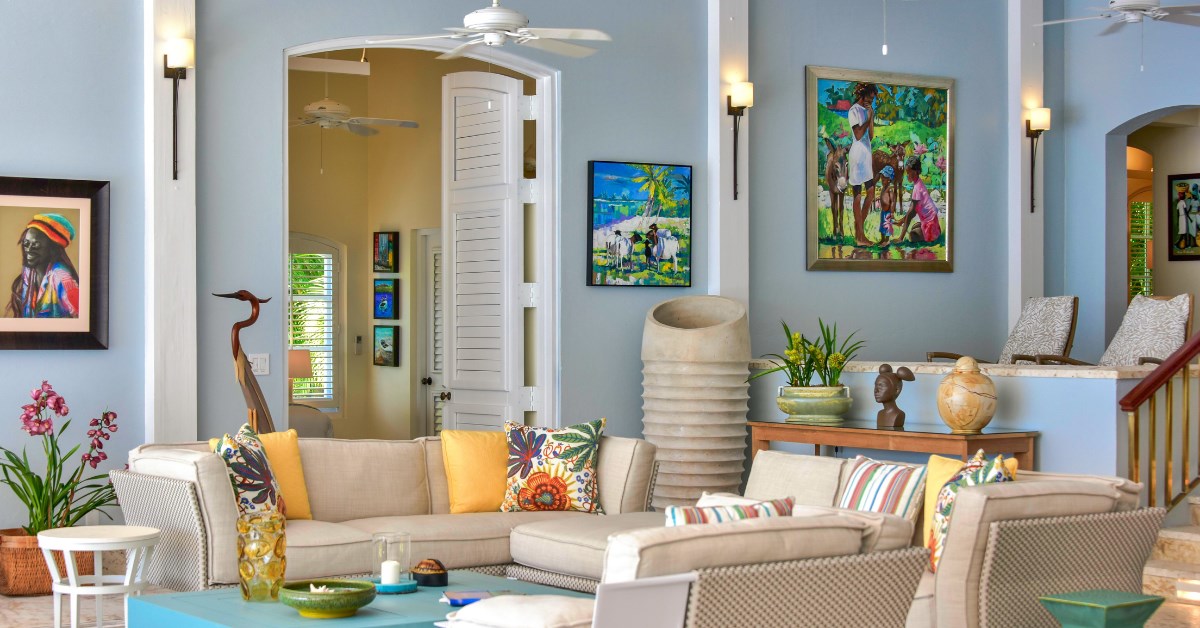
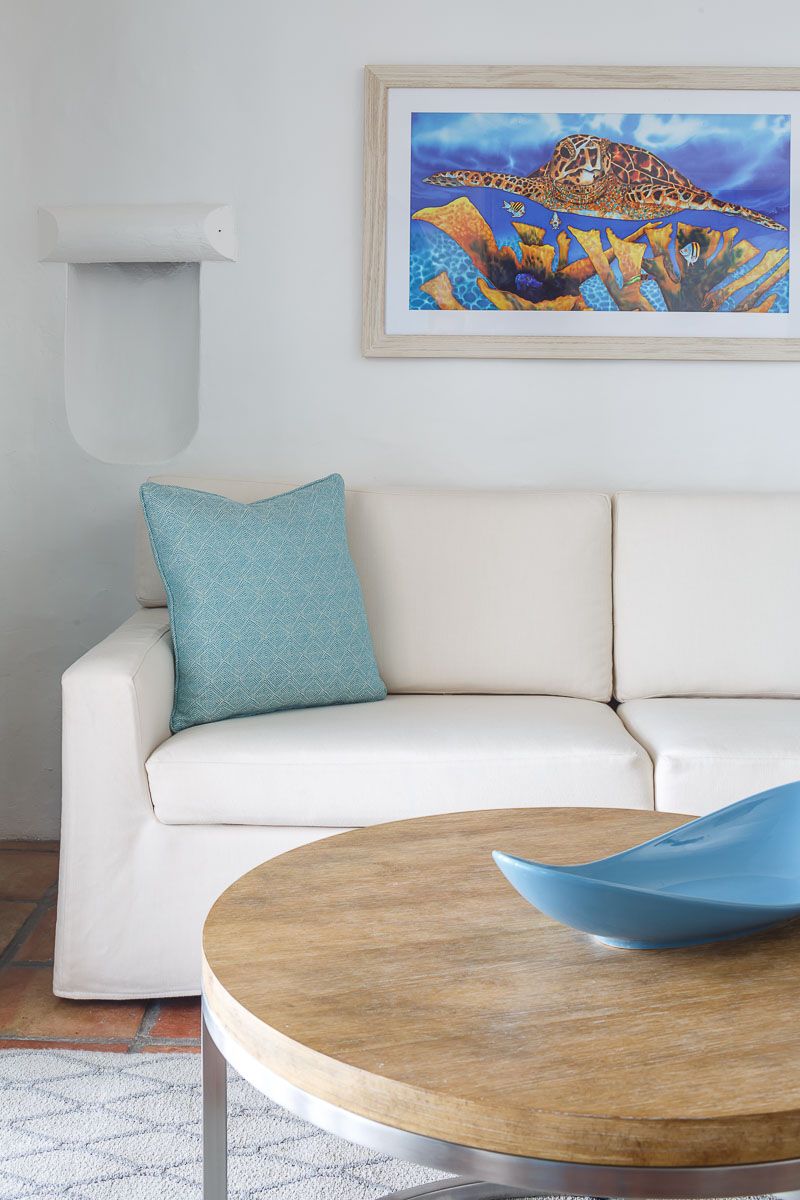
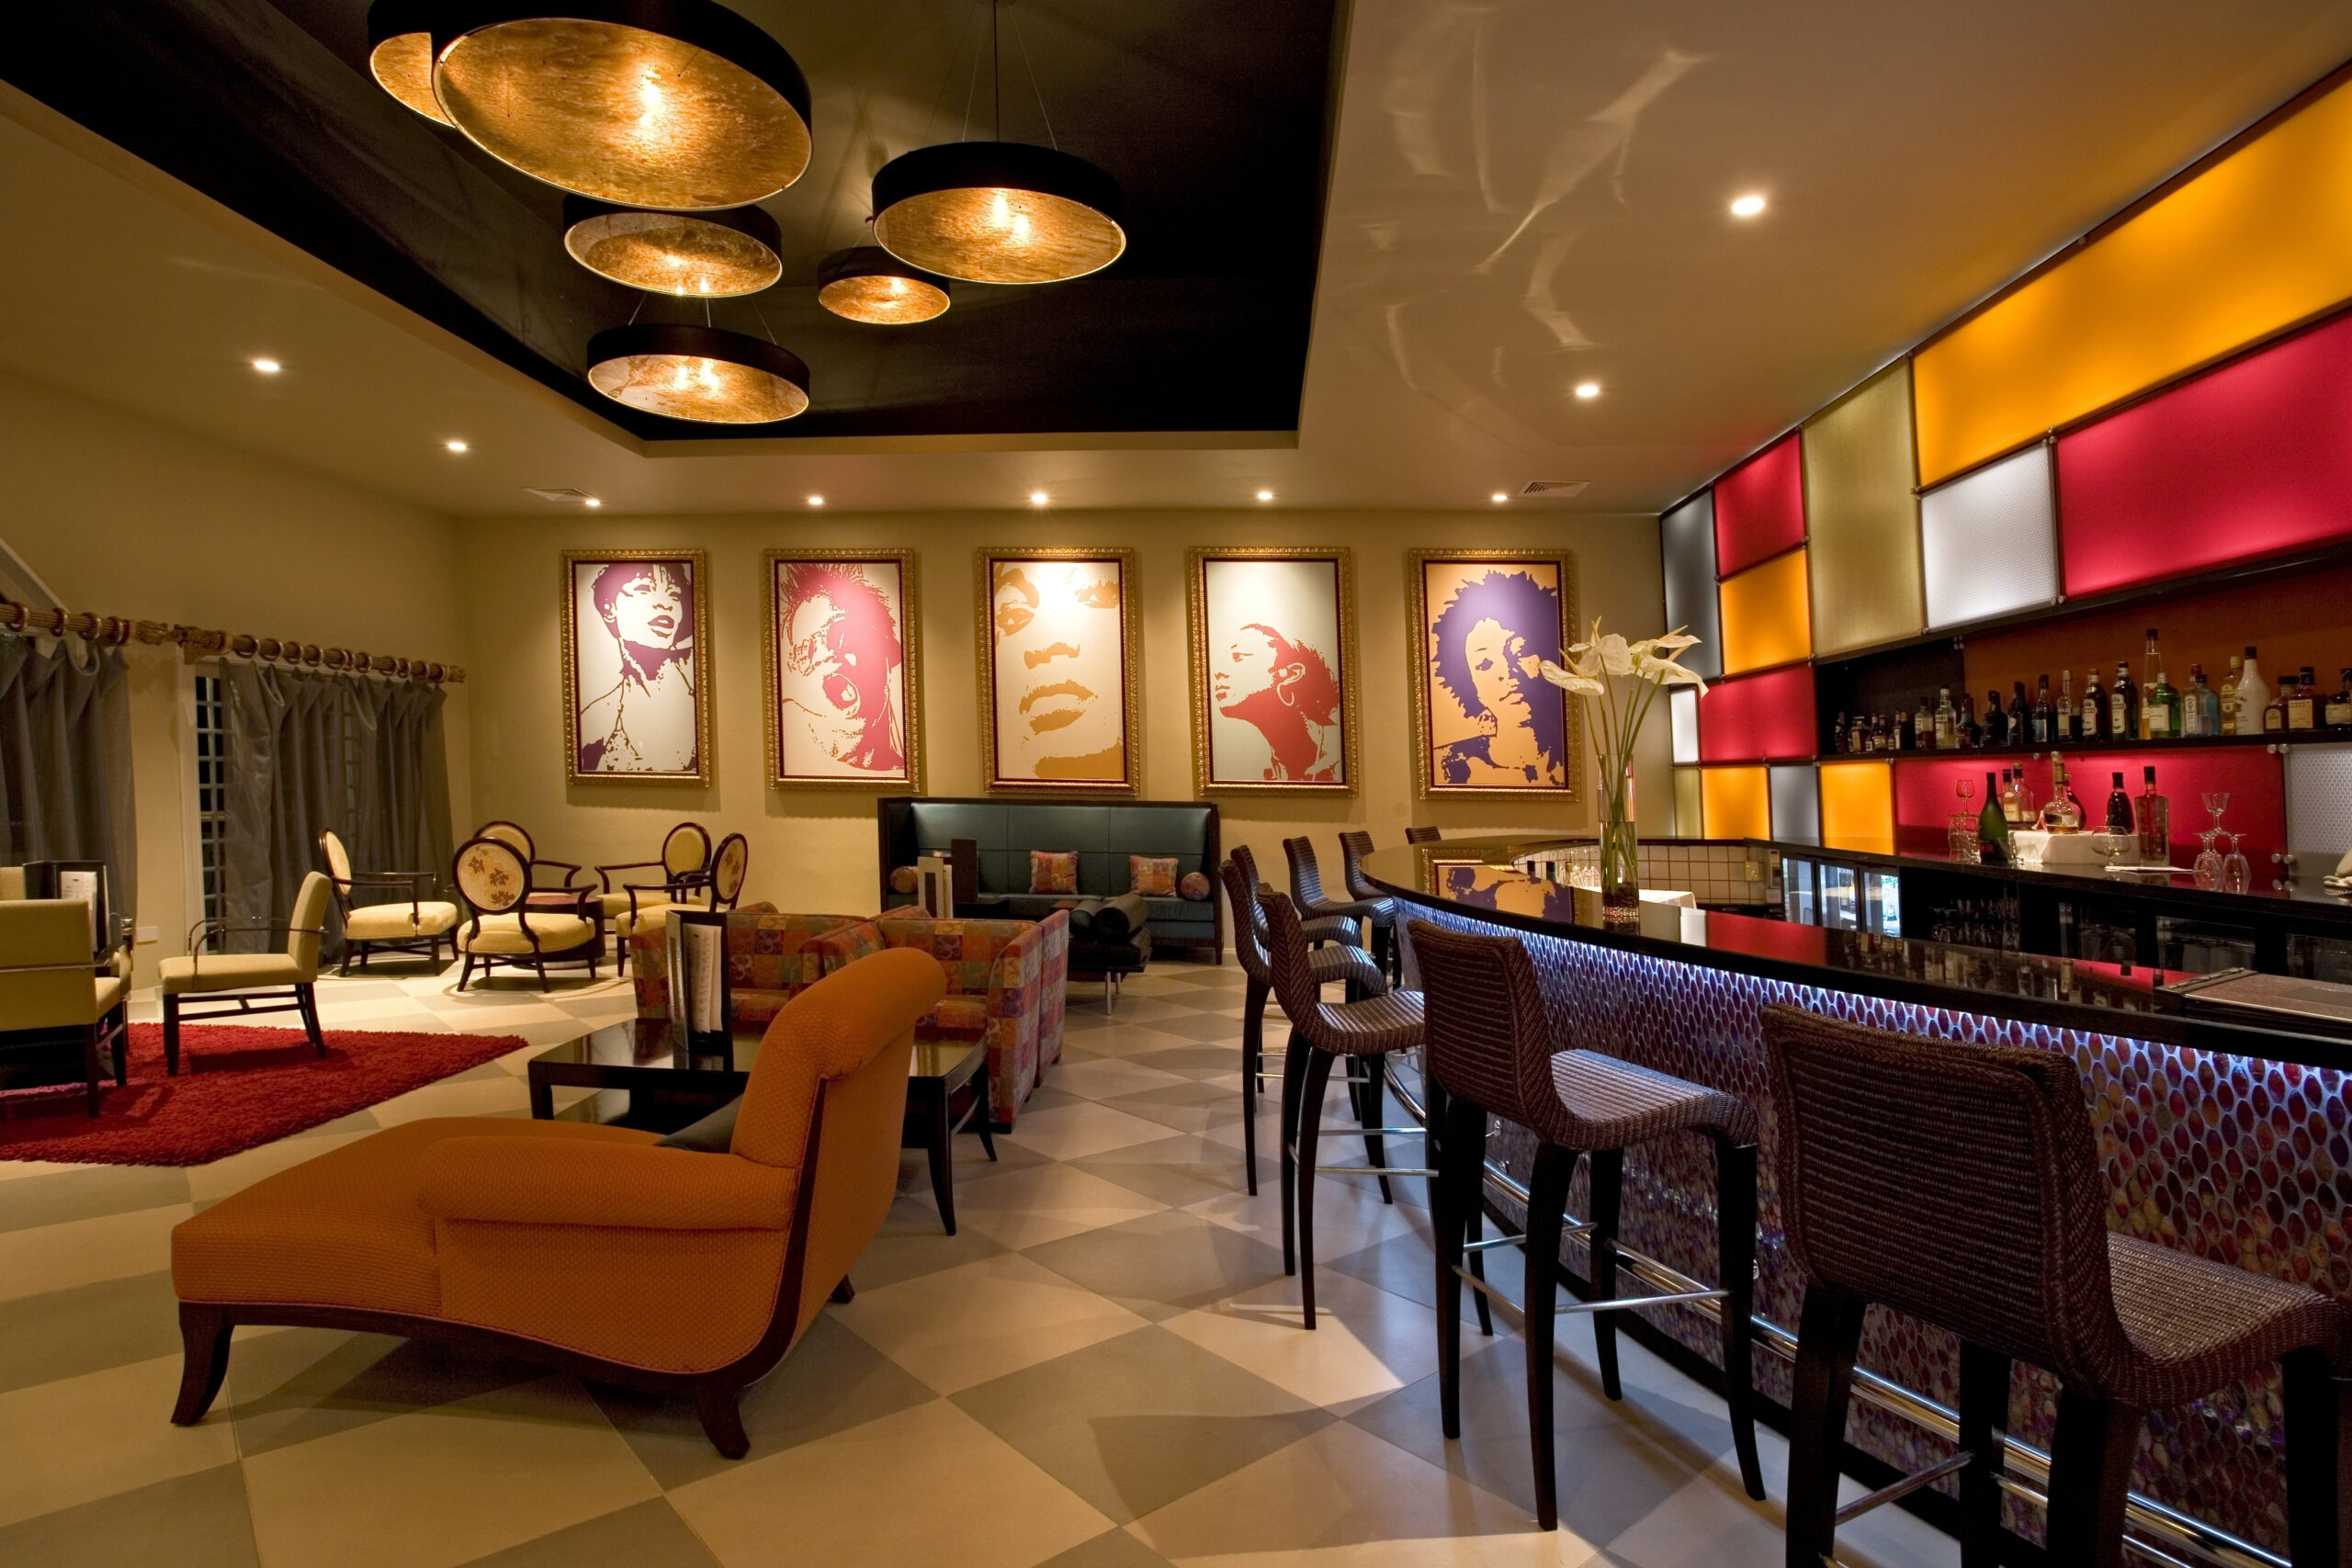
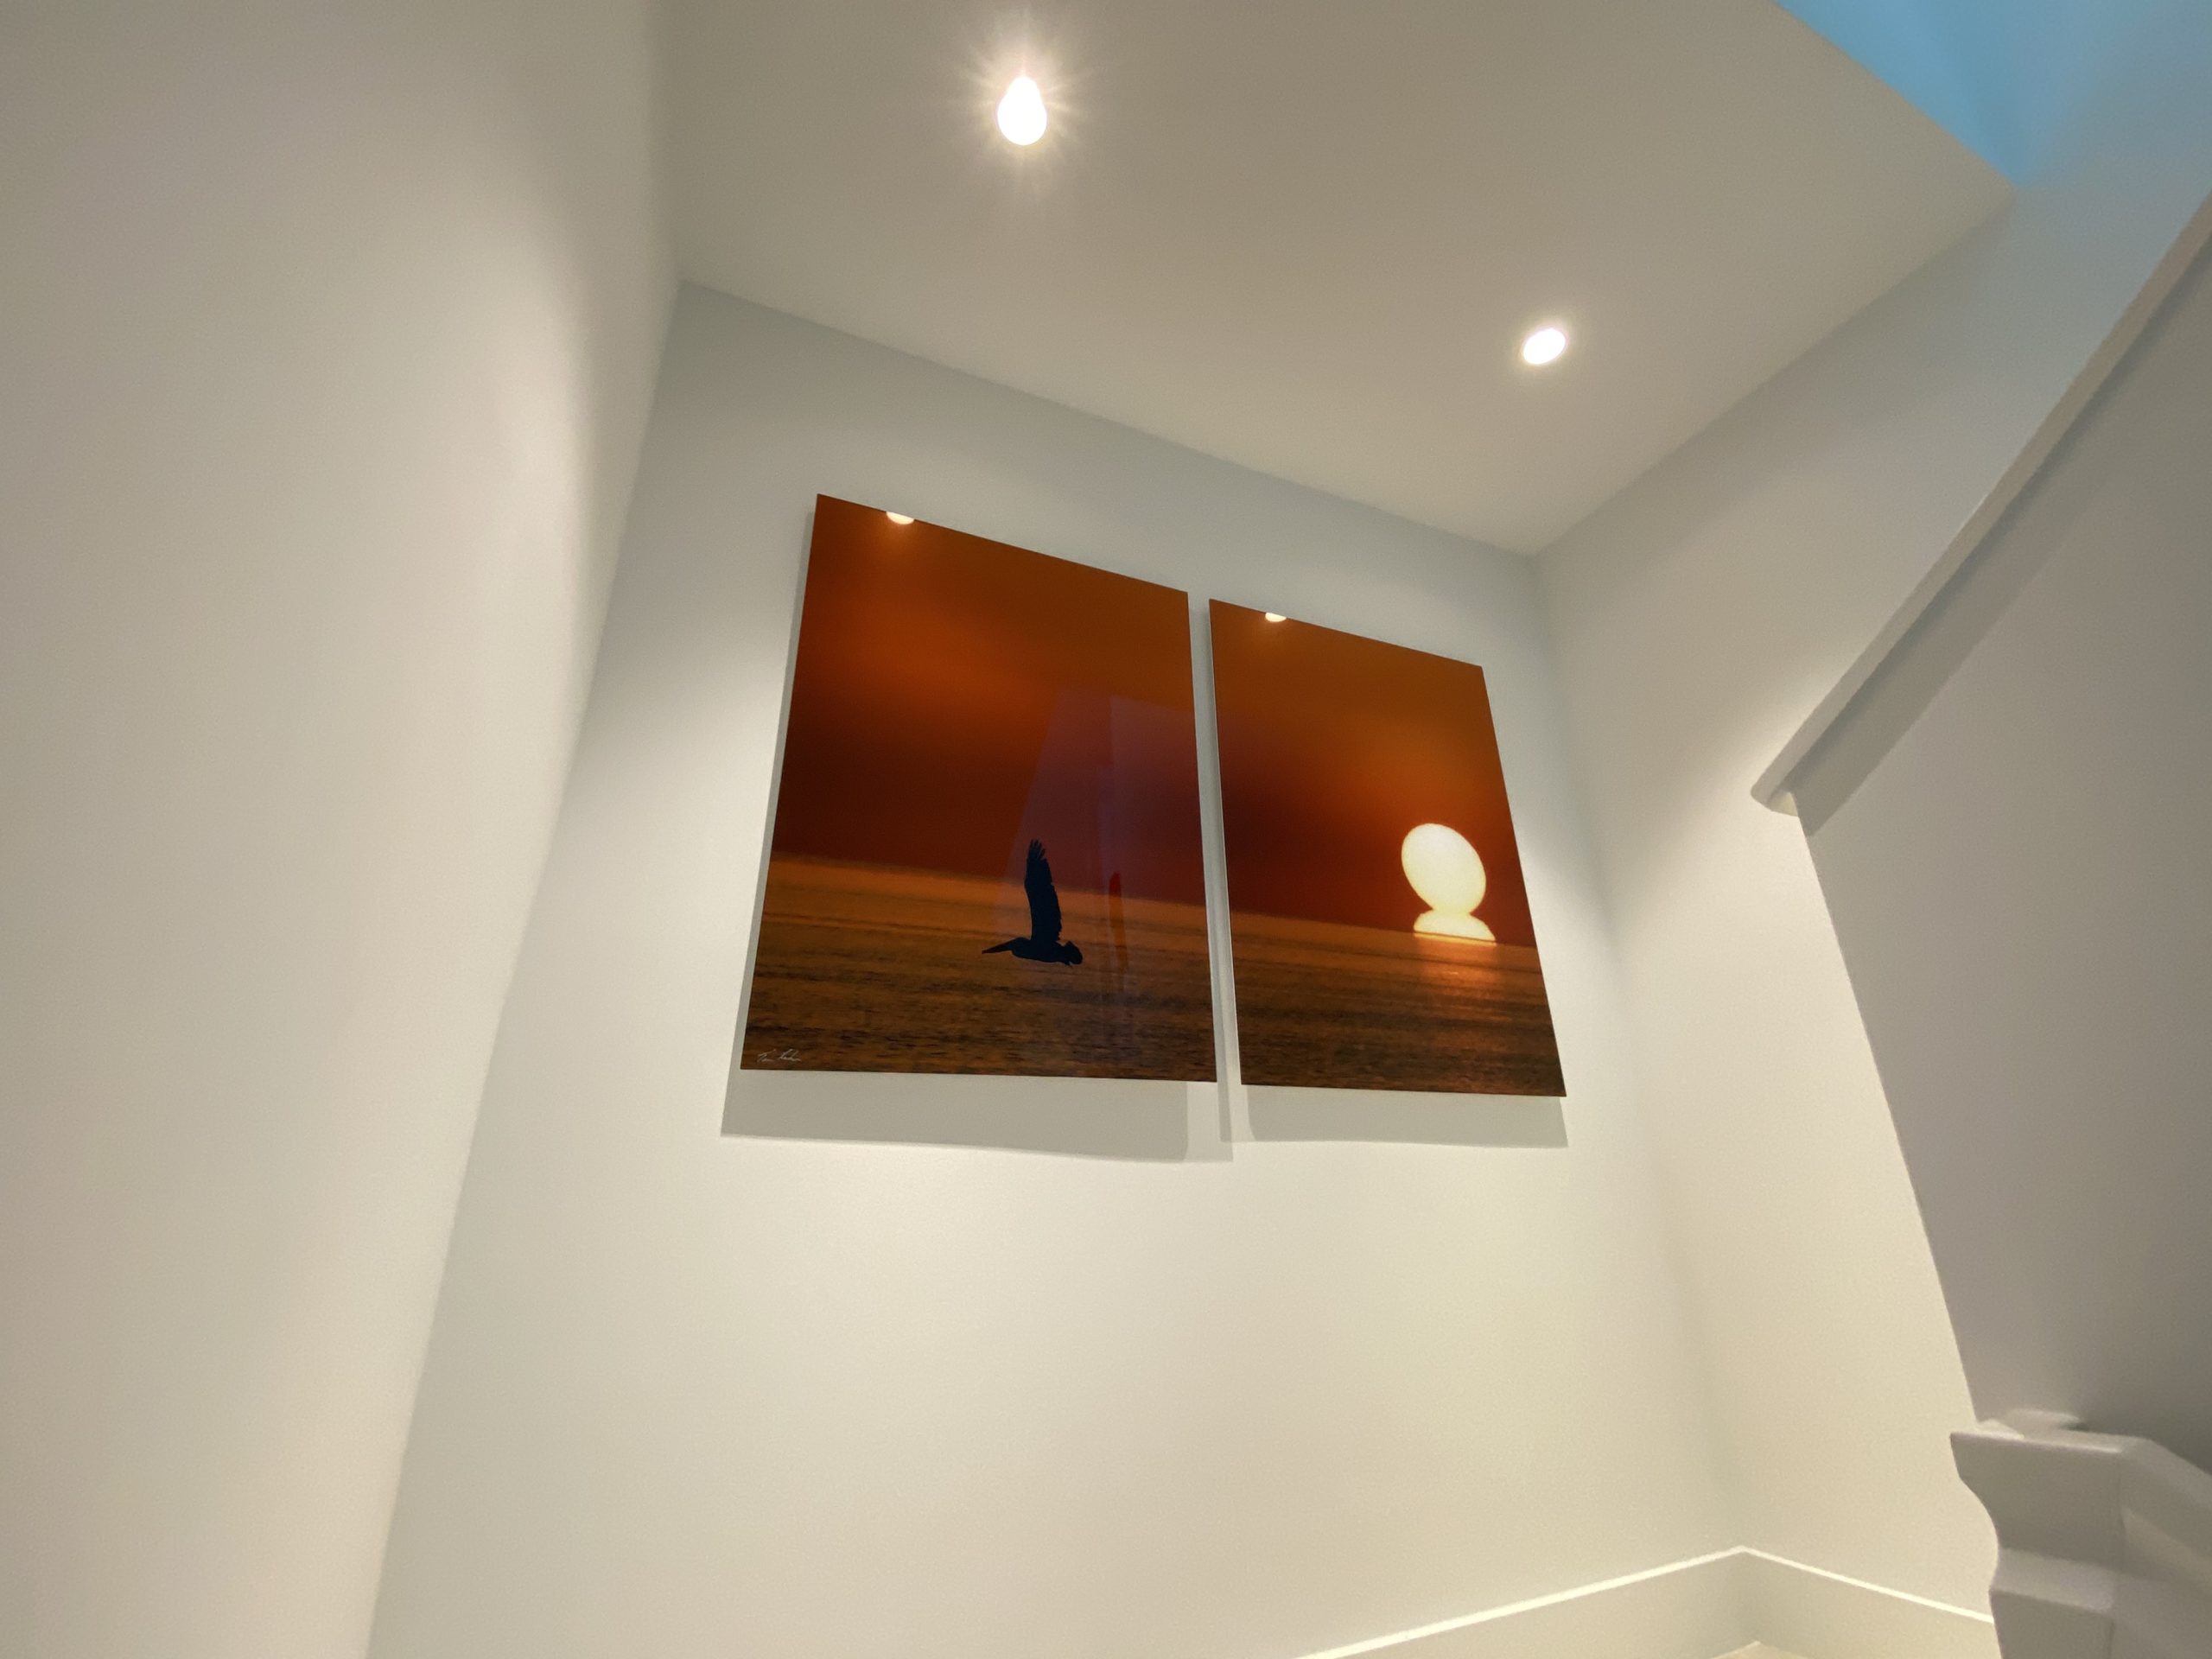
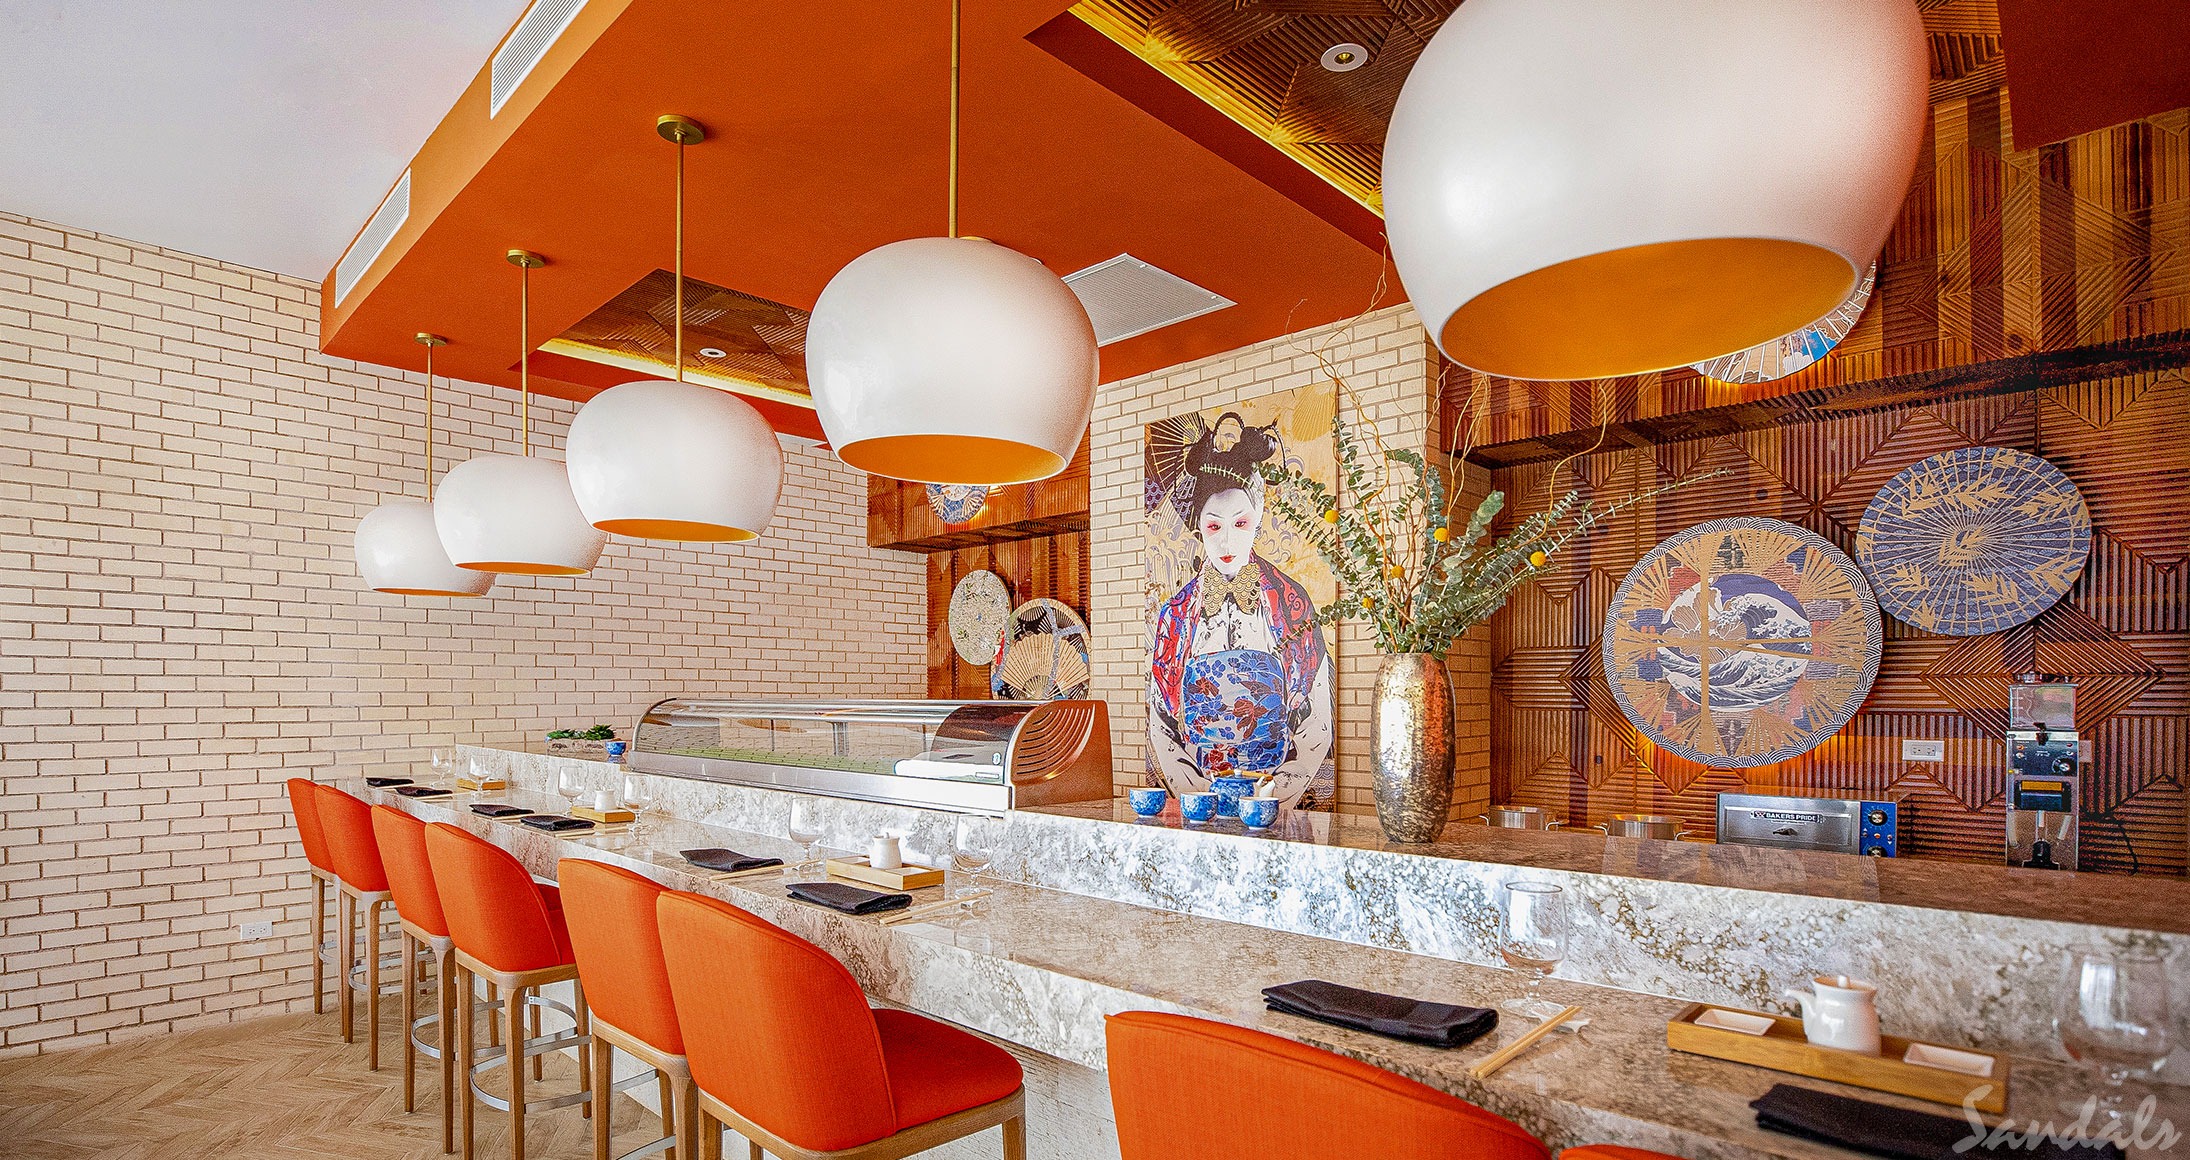
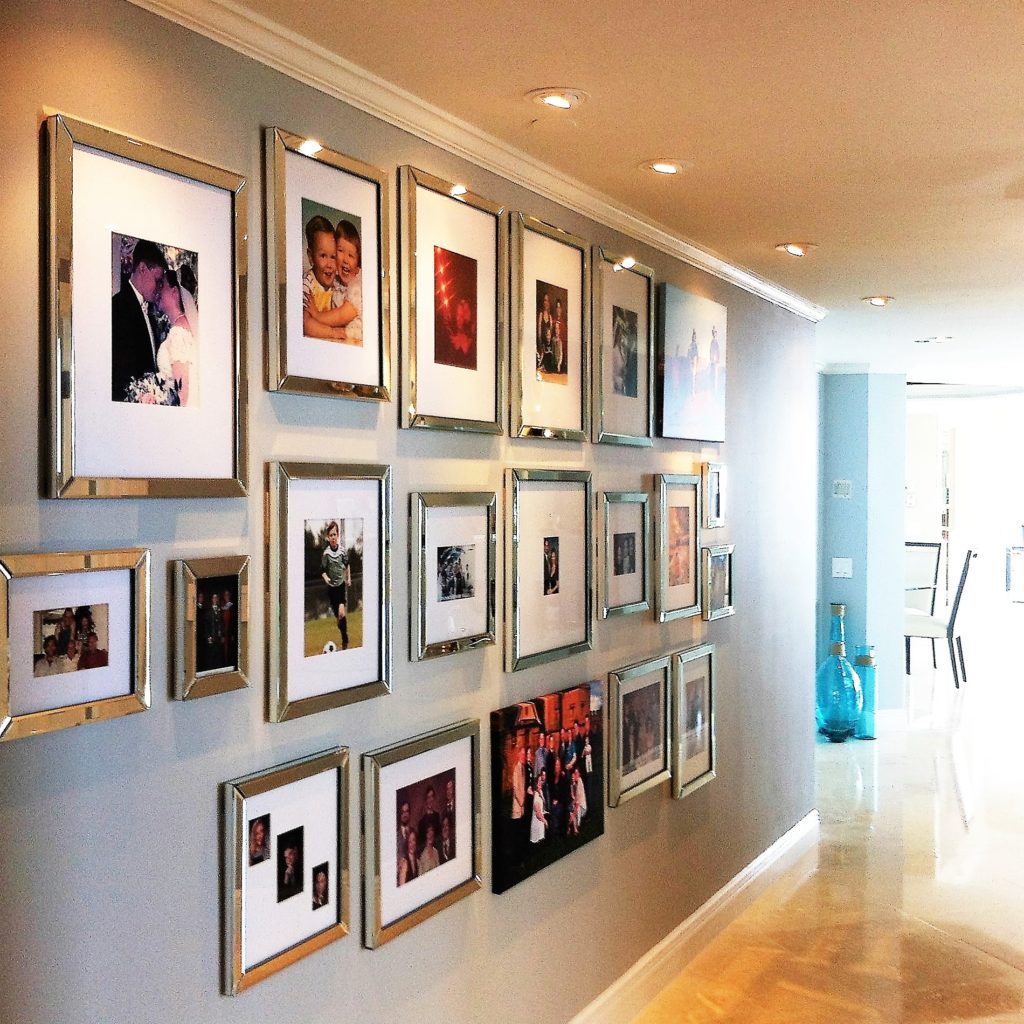
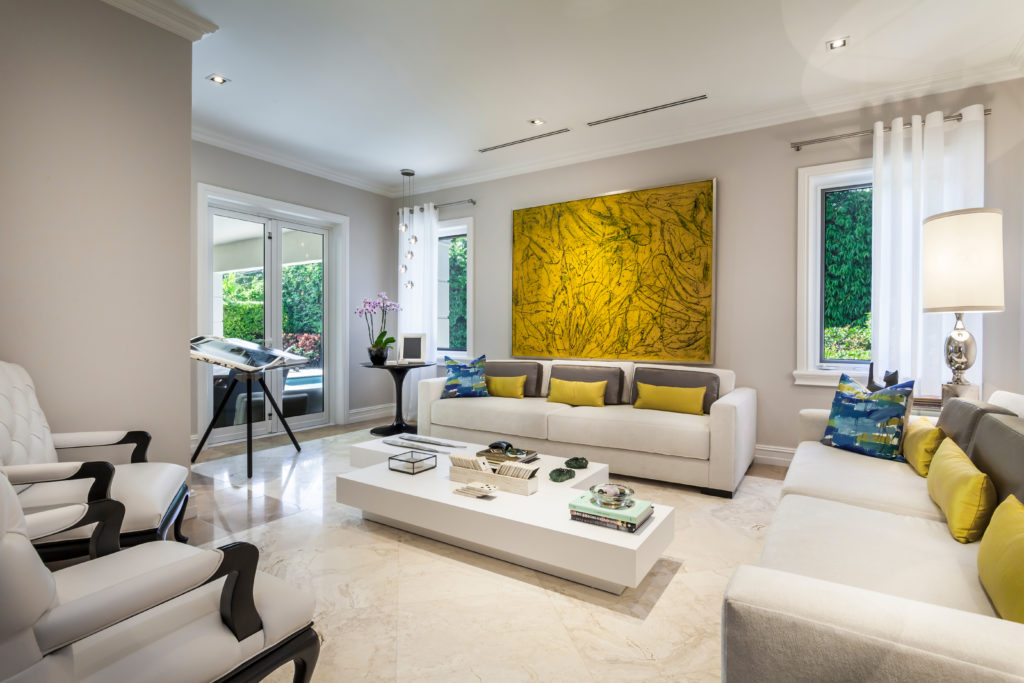
FrameWorks Miami is owned and operated by Christine Sweeny and Claire Lardner, both Certified Picture Framers. For more than 20 years, FrameWorks has provided professional custom framing solutions and design services to galleries, public and private art collections, artists, businesses, hotels, and residential clients.

Categories
Uncategorized

THE STEP BY STEP GUIDE TO PROFESSIONAL FINE ART PRINTING & FRAMING

Author: Cris Sweeny

The Step by Step Guide to Professional Fine Art Printing & Framing

This guide will show you where to find fine art printing for your prints, what fine art printing methods and materials you can use and how to choose the right frame….


…Plus more.


We believe:


Art is the final puzzle piece you need to put a well-designed room together.


So, what are your options?

Vincent van Gogh (Dutch, 1853 – 1890 ), Self-Portrait, 1889, oil on canvas, Collection of Mr. and Mrs. John Hay Whitney

You could buy a mass-print from one of the many online retailers, but…


What’s special about something factory made?


You could buy an original, but that would set you back more than you (or your client if you’re a designer) would probably like to spend on one piece.


In my professional opinion, the best option with the current printing technology available is fine art reproduction printing.


And THAT’s what this guide will show you how to do.


In fact:


The second chapter of this guide already shows you where to find $100’s of millions of dollars, worth of artworks by the Greats like Rembrandt, Van Gogh and Goya, just like Van Gogh’s self-portrait you can see above.


Plus where to access over 200,000 of beautiful untapped fine art photography from around the world…


All for free, ready to be made into custom prints which you can display in your own home or include in your client’s project.


Plus we are going to discuss a lot of other useful topics like:


  • printing styles and techniques
  • Fine art printing materials
  • How to pick the right frame
  • How to take care of your fine art prints and more.

Want to Download a pdf version of this guide to look at later?

Keep These 2 Things in Mind When Looking for Fine Art Printing for Reproduction

Let’s lay out the basics first…


There are two major factors to keep in mind when looking for fine art for print reproduction:


Image Resolution & Copyright Law

Image Resolution

You don’t want to end up with a granulated image on your wall.


(unless that’s a new modern look you’re going for)


Current printing technology allows us to print higher quality images at lower relative resolutions than before. But…


…there are a few factors to keep in mind.

Any images you plan to use for printing fine art prints should be 240 PPI or DPI in relation to the physical size you expect to print*.


Used interchangeably in the printing world, PPI means Pixels per Inch and has to do with a digital image whereas DPI is Dots per Inch and relates to how many physical dots are printed within any given square inch.


Having said that, ultimately how a print looks depends on its physical size, viewing distance and the material on which it’s printed.


Interesting fact:


Professional Billboards are only printed at 15 DPI and glossy professional magazine photos are printed at 150 DPI.


How to find any image’s DPI:

Steps 1-6.


  1. Go to the chosen image on your computer.
  2. “Right Click” the image file.
  3. Click on “Properties”
  4. Go to the “Details” Tab.
  5. Under “Details”, scroll down to “Horizontal resolution” and “Vertical Resolution”.
  6. There you will see the image’s DPI as shown in the image above in the highlighted green area.


* Still unsure how to make sure your image looks great? Get help from a professional printing expert. They have people who can make any image look its best.

Copyright Law


Images are intellectual property.

A photographer or artist owns the right to their image even if it’s online. Just like…

…a movie studio owns the rights to their movie.

Copying or using someone else’s intellectual property without their permission can lead to legal punishment and hefty infringement penalties.

Read on…

When looking for artwork to use for reproduction, you could buy the image from a paid image source.


But:


There are already plenty of great Free images out there that you can use legally!


These images are either under “public domain”. This means they are public property and can be used however you like.

Other images are under a creative commons license. Here’s the difference:


Most artworks that fall under creative commons are not allowed to be sold commercially and often have other such restrictions.


Now…


Let’s see where your can find high quality – and legal – images for printing fine art prints…

Where to Find Art for High-Quality Fine Art Prints

Great News!


Hundreds of thousands of fine works of art and fine art photography images are available FOR FREE to the public under a public domain license.


When you know where to look:


You can find many masterworks by your favorite classical artists, available for download and for use in your own custom print printing projects.

Here are a few of the best – in my opinion – resources to go treasure hunting for some of the world’s finest artworks to use in your fine art prints.

1. The Metropolitan Museum of Fine Art.

http://www.metmuseum.org/art/

With over 400,000 public domain images of art pieces, the Metropolitan Museum of Fine Art is a great place to start.


Tip: Make sure to select “public domain” in your search.

2. The National Gallery of Art


https://images.nga.gov

The national gallery of art is another great place to look. They have over 35,000 works of art from artists including Rembrandt, Van Gogh, and Goya. You literally have access to some of the world’s finest art at your fingertips here.

3. Internet Archive


https://archive.org/

The Internet archive is meant to be “the library of the internet”. The site itself claims to have “millions of free books, movies, software, music, websites, and more.”


4. The Library of Congress
http://www.loc.gov/pictures


The Library of Congress has many artworks under public domain and in fact just released over 2,500 images of original traditional Japanese artworks for those looking for something classically Eastern.


Artistic Photography and Original Illustrations for Prints


Looking for professional level pixel-perfect photos or illustration to use for printing custom fine art prints?


Here are two of the most well-stocked – non-stock photo – resources online. They are especially great for anyone looking for landscapes, animals, or artistic portraits.


1. Unsplash.com
http://www.unsplash.com


Unsplash.com is relatively new. It’s only been around since 2013. But with over 200,000 photos by professional and hobbyist photographers, it’s one of the best places on the internet to find beautiful images you can print with ease. 


2. Pixabay.com
http://www.pixabay.com


Pixabay is Unsplash’s bigger and older brother. This site has been around since 2010 and has since collected nearly 1 million public domain images and illustrations from contributors around the world.


Unlike Unsplash – which is purely a photography library – Pixabay also houses a large collection of original hand and computer generated illustrations.


Click here to check out the resources section for 30 more places to find great images.

What is Giclee printing?

The name Giclee (pronounced Zhee Clay) originates from the French word “la giclée”, meaning something that is squirted or sprayed.


Giclee is a printing technique that produces Ultra High quality inkjet prints.


Here’s how it works:


Professional artists and printers use high-quality fade-resistant pigment based inks on the archival substrate, which is a special acid neutral photo paper that makes images last longer while maintaining their color.

Basically, when done right:


Giclee results in stunning art reproductions in fantastic detail, even from the closest distance.


Keep this in mind!


If you’re thinking of having your prints printed using the Giclee inkjet technique, your images need to be a minimum of 300 DPI (dots per inch, like we discussed).


This is an absolute must because of Giclee’s fine detail.

The other option is…

Offset Printing

Offset printing is one of the most widely used and oldest styles of printing and has been around since the 1870’s.


When offset printing, an image is split into four “color channels” known as CMYK. This stands for Cyan, Magenta, Yellow, and Black.


(K is black because the other colors printing plates are actually aligned with what is called the black “Key plate” during the process)

Most mass-produced printed materials are still made today using offset printing.

Think of newspapers, books, magazines, and most posters.

 What’s so good about offset printing?

Offset printing can work out cheaper than other styles of printing when dealing with large quantities.

Another advantage to offset printing is the quality:

Offset printing results in high-quality final images, which is exactly what we are looking for when reproducing fine art.

What are some disadvantages of offset printing?

A drawback to offset printing is the initial set-up cost.

Because…

Each new project requires color preparations and configuration.

This also means that Offset printing can take time, which can lead to frustrations. Especially, if you need something done urgently.

What Material to print fine art on:

If you’re printing fine art…


It doesn’t mean you have to print on paper or canvas.


Take a look at what our founder shares about the range of materials FrameWorks Miami likes to use:

There are lots of creative mediums on which you can print fine art.


And..


When you have a good professional printer…


the options are (almost) endless.


The Key to picking the right Material for your art.

Here’s an art world insider tip:


Start with the subject.


Think about what print medium will best connect with the image…


Emotionally, logically and aesthetically. Does it communicate the overall style you are looking to create?


As a general rule:


Reproductions of older artworks such as Van Gogh’s or Rembrandts tend to look more “authentic” on matte materials.


Whereas…


New, floral, or bright landscapes “pop” more on glossy mediums.


But remember:


There are no set rules of what is wrong or right in fine art printing. Be creative!


Let’s look at some materials in more detail, starting with the obvious:

Paper

Paper is the most versatile and commonly found printing material.


There are many kinds of paper. Each with their own subset of characteristics, value and best uses.


For example:


Then a matte, non-glass paper is often more effective.


Or would you like your art to have a more modern and eye-catching sensation? In that case, glossy would be the way to go.


But there is more than just matte or glossy. There are four main categories of paper.

The 4 Main Types of Professional Printing Paper

Matte Paper


Matter paper seems a little grainy to the touch and doesn’t have the distinct shininess to it that glossier papers have.


It’s great when you want something to have a softer look.


Matte paper is also useful for prints which will be kept behind glass. Because it results in much less obstructive glare than its glossier counterparts.


In addition, matte paper also has that “paper” texture to it, which is great when making prints people will touch or feel, like when printing a physical portfolio.


Luster/Satin Paper


Luster and Satin are types of what are known as semi-gloss papers.  They are halfway between fully glossy and matte.


The great thing about a semi-gloss paper is that it will still give you that glossy sheen, but won’t be as intense as glossy, which also becomes highly reflective and often difficult to see at certain angles.


Chat with your printer when deciding if semi-gloss is right for your needs.


Fiber base (Baryta) Paper


Baryta paper is the standard choice for high-end fine art photography. You’ve probably seen it without even knowing it. Most art galleries use a fiber based paper.


Baryta paper uses a chemical called barium sulphate in its coating process.


This chemical enhances an image’s detail and definition whilst slowing the print’s aging process, otherwise known as archival permanence. This results in a longer lasting, high quality print.


Baryta paper is great for high value pieces you wish to keep for a long time.


Glossy Paper


Glossy paper universally popular for its high d-max and signature shine.


(Dmax a measurement of a paper’s maximum density and basically reflects how much black the paper can absorb.


A higher Dmax rating means deeper black inks. The ultimate depth depends on both the paper and the ink. That’s why it’s also important to find the right combination.)


This is especially important for us at FrameWorks. Our (new) fine art printer uses four kinds of blacks in every image for maximum image quality.


So a paper with a high Dmax can really make the most of the fine art printer’s capabilities.


We love glossy paper because it creates bold, striking images.


But…


It can also lead to reflective glare. It’s also normally not suitable for reproductions of older or pastel colors where it will contradict the style of the artwork.


Other Materials


Brushed Dibond Aluminum


A popular choice for larger commercial prints and often found in offices and hotels.


Brushed aluminum provides a modern look with a metallic sheen where lighter colors are used but a contrasting matte finish on darker pigmented areas.


It’s a popular material for artwork displayed outside because of its highly durable and waterproof nature.

People tend to love using it as a creative medium for fine art photography depicting city landscapes or scenes with concrete and metal.

Metallic, High Gloss Photo Paper

This high gloss metallic paper provides a “pearl-like” glossy sheen.


It’s well-known amongst artists for its brilliant whites and high Dmax, which allows for intense color reproduction. Especially with highly contrasted images.


Metallic high gloss photo paper has the advantage a generally long lifespan due to its chemical stability. It is also quick to dry and resistant to moisture damage.

A drawback of metallic photo paper is that it requires the right kind of lighting to reveal its best qualities. It’s also not a suggested material when printing skin tones or portraits.

Glossy Canvas

Glossy canvases are a popular choice for fine-art reproductions.


Likely due to their ability to intensify tonal characteristics of an image and to give a piece of art the sense of deep vibrant colors – even when the original artwork didn’t have them.


Pro tip: Glossy materials often mask an image’s smaller details. If your artwork has many intricacies, We suggest going with a matte canvas to accentuate the finer points.

Glossy & Matte Vinyl


Vinyl is a commonly used material for larger banners and backdrops.


It’s easily stored and moved from place to place, which also makes it especially popular for events and temporary installments.


Insider info: The Red Carpet backdrop celebrities take photos in front, of is a vinyl print.

Plexiglass

Acrylic, better known as plexiglass, is a versatile printing medium with many advantages.


Plexiglass provides a crisp image. It’s a durable material that can withstand weather changes and hard knocks. You often see outdoor signs printed on plexiglass.


(Think of those little signs with plant names on them in parts and the botanical gardens)

Another advantage of acrylic mediums is that they create a “3D feel” to an image. It also allows more light onto an image in comparison to other materials, due to its transparent layer. Allowing it to look stunning even in low light areas.

Wood

Wood prints create a unique artsy look. Each wood print is unique, because of the grain differences in the wood itself.


Wood works really well when the art subject is wood, such as this barn artwork on the right.


Wood mediums tend to couple well with country style or ancient Asian pieces. (Remember, the original ancient Japanese art?)

Restaurants and cafés often love using wood for their art displays. Next time you walk into a Starbucks, take a look around. You’re bound to see a wood print.


Now…


Once you’ve found the right material for your art reproduction:


How to pick the right frame for your print

A frame can change the whole feeling of an art piece.


Picking the wrong frame can make even a Van Gogh look dull.


Whereas the right frame will complete your art’s story, like the missing piece to the puzzle.


Here’s what I can tell you after years of owning a picture framing business and helping thousands of people find the right  custom frame:


Picking the right frame for a piece of art is just as much an intuitive process as it is a skill.


But, as a rule of thumb…


Here are a few frame matching techniques you can follow:


Balancing Opposites


If an image if full of life, bold, or very eye-catching in and of itself, a minimalist frame will often help balance the image’s vibrancy and allow the art to hold your attention without seeming “too much”.


On the other hand, if the print is clear, minimalistic or simple, you can go with a lavish gold or ornate custom frame.


The flamboyancy of the frame will help build a bigger story around the artwork, making it part of a larger scene and making the image seem more valuable.


Color Matching


Color matching is a simple design technique used in all areas of creative design from interior decorating to professional branding.


In picture framing, this technique is where you take a “sample” color from the artwork and re-use it in the surrounding frame.


This creates a subtle consistency between the image and frame.  


Here’s an example:


If you have a picture of an orange, you would pick a frame that matches the orange tones seen in the art work, or one that matches the orange’s surroundings in the image.


Theme Matching


This framing technique is similar but slightly different to color matching.


Most works of art have a theme:


It may be a beach theme, a city theme, a nature theme or something else.


Theme matching is when you pick a frame which matches the overall theme of the art.


Some like to use a thick wooden frame for a picture of a picket fence, or a bright glossy frame for art photography of a bowl of candy.


This is theme matching. Finding the “textures, colors, and motifs” or the art and using them in the frame itself.


Environment matching


This technique is different from the others.


Instead of looking at the artwork itself, we find inspiration in the space around the artwork, where it will be displayed.


If we know the print will be displayed in a hotel lobby with dark leather chesterfields and luxurious stately colors, we may opt for a similar style dark reddish brown frame to align with the theme of the print’s environment.


After all…


It would look strange to put a beach themed picture frame on a piece surrounded by dark leathers and conservative styles.


Having said all this about frame picking techniques, I think, ultimately, the best technique is:

Merging all of these techniques together.


Try to keep each factor in mind when picking a frame. Think about the theme, the colors, the environment and how to contrast or balance the image with the surrounding frame. It’s possible.


In fact:


This can work brilliantly, even when the artwork doesn’t align with the theme or is in fact opposing the environment’s overall theme.


How to take care of fine art prints

Ok. So you have your artwork and it’s framed beautifully.

But…


Without the right care, it won’t last long.


Here are our top tips for taking care of your fine art prints to maximize their lifespan and vibrancy.
Sunlight & Indoor Lighting


Unlike real flowers, prints of flowers – or prints of anything for that matter – don’t like sunlight.

In fact:


Direct sunlight or even artificial light will make your prints fade, quickly.


All prints are made with chemicals which react to environmental factors, especially light.


And…


…Just like our skin, the sun’s UV rays can also damage and prematurely age your artwork.


A good way to protect your prints is to use UV glass or UV acrylic glazing which can block up to 98% of harmful Ultra violet radiation.


Also:

Keep your prints at least at a medium distance from heat sources. such as heaters, strong lamps, fireplaces and cooking areas to avoid damage.


The best would be to hang prints at a minimum of 1-1.5 feet away from lights or heat sources.


Humidity


Humidity (something of a troublemaker here in Florida) is especially damaging to fine art prints.


Long exposure to high levels of humidity will quickly cause mold and discoloration.


Plus…


Humidity tends to attract pests like silverfish which also love fine art.


(they have good taste)


Here’s something else you may not have thoughts of.


Indoor plants.


Especially in warmer climate areas, when we water indoor plants, we are inadvertently increasing humidity levels in the plant’s immediate environment.


That’s why:


Keep your prints in well-ventilated areas – away from indoor plants.


For those up North with colder winters, do not place your prints directly above the heater.


Paper and canvas prints can warp and become brittle when exposed to hot dry air for long periods of time.


The colors on almost any printed material will also fade and deteriorate when exposed to direct heat sources for longer periods of time.


Bathrooms & Kitchens


If you would like to hand your prints as part of the décor in a bathroom or kitchen area, we recommend glazing on the front to protect them from humidity and environmental pollutants.


Also ensure the back of the print is sealed properly to stop moisture from leaking into the print.


(Concerns around moisture are – of course – more important with paper or canvas but not as big of a problem with plexi-glass or brushed aluminum.)


Handling prints


Some people go the full Hugh Hughes, with white cotton gloves and face masks when handling prints.


But…


I can tell you, it’s not necessary.


Just be sure when handling prints, especially paper or canvas ones, that your hands are clean, and free of excessive oils.


Also make sure you do not touch the printed areas, the mount board, or the mat. Oily fingerprints can and will leave an irremovable mark.


The proper way to handle prints is by gripping opposite corners. For example, grabbing the top right corner and the bottom left.


Allow the print to sag slightly in the middle, but be careful of creasing it. Because, it is almost impossible to remove dents, creases or folds from paper prints.


Pro printer tip: The borders around an art piece are for handling it. Don’t trim or cut down the excess border on your artwork. It makes it difficult to handle the print without damaging it.


How to store loose prints


If you have prints that have been taken out of their mounted frame for any reason, they should be placed in separate acid-free paper folders and stored horizontally.


Under no circumstances should prints be kept with the printed sides touching. This will damage both prints.


Make sure the space in which they are kept has a relatively stable temperature and humidity levels. The best is anywhere between 40-60% humidity and 60-80 degrees Fahrenheit (15-25 Celsius).


Also, keep an eye out for pests such as silverfish, ants or worms which can severely damage your art.


Pro printer tip: One natural remedy for keeping silverfish and ants away is the use of clove oil. Wipe a small amount of clove oil in the vicinity where the prints are kept, but never on the prints themselves.


Keeping your Acrylic or Glass Frame Clean


Acrylic and glass casings and frames are simple to keep clean.


An easy way to do this is regular dusting.


We recommend using a fine duster or a soft rag to carefully remove any dust from the surface of the glass or acrylic.


But it’s also good to do a thorough clean once in a while


Simply dusting can’t get everything.


Properly clean the surface every few months with real surface cleaner.


But remember to spray the cleaner on your cleaning cloth or material, not directly onto the glass or acrylic itself.


Spraying onto the frame may not be a problem, but cleaners tend to drip and droplets can get onto an artwork’s frame or mat which could damage the print.


Lastly, we recommend using a natural cleaning spray without alcohol or ammonia ingredients, which tend to be harsh.


——-


Now that you know all the steps of finding art, printing it, framing it and looking after it, you’re ready to start printing prints with a professional.


If you’re looking for even more information…


We’ve collected some of the most useful resources we could find on the internet (including a few of our own) with more in depth tips, tools and techniques in different specific areas of printing.


Happy printing!

Want to Download a pdf version of this guide to look at later?


Useful Fine Art Print Printing Resources

Printingforless.com
A glossary of commonly used printing terms.


 Berk-edu.com
A deeper look into Fibre-based printing paper [pdf]


 The Metropolitan Art Museum
The MET’s open resource policy


Traditional Fine Arts Organization (tfaoi.com)
The ins and outs of Art Copyright Law


Urban.com
Image Printing – a digital guide to image file sizes.


99Designs.com
30 Public Domain Image Resources.


piezography.com
A deeper look at Dmax and how it applies to your art choices.


Lifehacker.com
Photoshop tutorial for color correction and photo retouching.


RealSimple.com
A guide on how to choose the right frame for an art piece.


FrameworksMiami.com
13 Creative Fine art print framing ideas


A short but informative video about DPI printing resolution.

Categories
Uncategorized

33 STUNNING PICTURE FRAMING IDEAS YOUR HOME IS CRYING OUT FOR

Author: Cris Sweeny

33 Stunning Picture Framing Ideas Your Home Is Crying Out For

Whether you have a penchant for picture framing ideas for displaying your favorite art pieces or always want to have your most treasured family snaps on show for all to see, one thing is certain, no wall is complete without a few accessories


The art of picture framing can be a complicated business, with each aspect requiring attention before the final look has been achieved. From types of picture frame, placement and of course choosing the perfect images, all of the many factors can make or break a display and as always, the devil is in the details.


The prospect of creating a statement display in the home may sound daunting, but fear not, we have asked top interior bloggers to share their favorite picture framing examples and leading interior designers their best tips to inspire your next photo display in the home. Take a peek at the 33 picture framing ideas below…

Becky Freeman @ The Spirited Puddle Jumper


I absolutely love the perspective that these framed images give. From the small images on the larger white backgrounds within the frames to the fact that the frames are overlapping, really adds interest to what could be a fairly usual display. I’d love to try something like this in our new home!

Scott Purcell @ Man of Many


We love the framing of this artwork by Beastman as the white border really helps to make the colors pop. Also, the actual piece is floating within the frame so it feels like the artwork is literally jumping from the wall. It also helps to provide some further depth to the artwork.

Sue De Chiara @ The Zhush


Lately I’m loving how a grid of art or photos looks on a wall. When pieces are framed the same size, using the same frame, there’s something very soothing to the eye yet still very interesting to look at.

Pro Tip – Charles Neal

Picture framing should always compliment the imagery, award, or artwork that is displayed. Frames that are not cohesive detract from the beauty and steal the show from your special piece you are wishing to showcase. As an interior designer, artwork displays are an essential part of my creations. I utilize the art to convey and reflect the personality and style of the homeowner. Thus the framing needs to equally accent the piece in a pleasin

Rachel Southern @ The Ordinary Lovely

My preference is for living spaces which are light and bright, white and colorful, so I love simple, thin frames, preferably in white or black. I like prints and images to stand out so wouldn’t choose a frame which detracts from them. In this instance, I love the way the frame complements the typography. They work together really well to make quite a simple quote an interesting piece of art.

Chrissy @ Organise My House

When framing a photo or smaller piece of art, you can make it have real impact by using a massive mount and a large frame. This will make it stand out, and feel really contemporary. They also look great in groups of 3 to make it even more stylish. (Adding a mount can also make even a less expensive frame look stylish and costly!).

Jason Grant, Interior Stylist

I love collecting artworks and prints – usually by clever friends – I love to display them in a gallery style wall that I add to – keeping the frames in similar timber tones for a touch of uniformity.

Catherine Lazure-Guinard @ Nordic Design

I just love the beautiful simplicity of this framing method: Images positioned off-centered in larger frames. It is creative, original and elegant at the same time. This works very well for a series, as I think this approach has a greater impact when at least three or more pictures are grouped together. A thin, black frame as shown here doesn’t overpower the artwork and enhances the minimalist look. (Image Credit: Ash James for Cereal)

Pro Tip – Daniela Nuila

To get the most use out of your picture frames, think double duty. By this I mean they should #1- serve the purpose of displaying personal pictures (of course), and #2-also serve the purpose of being decorative. For a neat and put together look, try grouping different sizes of pictures using the same frame. By using the same frame, every picture has the same outline and thus, is cleaner to the eye. But for a more curated and eclectic look, try different frames in different colors and sizes. This will definitely be fun and spontaneous and each picture will have a personality all its own.

Maite Granda @ Interiors by Maite Granda

When decorating your home consider neutral colors on the walls and use a unique artwork to create an accent.  White walls are always the best to stand up any artwork or gallery wall.  My biggest suggestion is to consult an expert on framing, you won’t go wrong.

Pro Tip – Pamela Hughes

The frame should always be subservient to the artwork. It should be synchronous with the time and the style of the artwork. The frame should catch and reflect light (called luminosity). Gold is used frequently as the color of the moulding as it reflects light so readily, and is neutral as a color.
For matting of paper pieces, matts should be weighted slightly on the bottom to contract the illusion of being top-heavy.For contemporary pieces, matts can be oversize, even to three times the size of the artwork with massive weighting on the bottom.

Sara Chiarilli @ Artful Conceptions

First is I love a framed mirror in a bathroom. It gives a nice highlight and a finishing touch.


Second artwork needs the right frame, especially original pieces. A gallery wrap is ok for a few pieces but the majority need framing that shows off the artwork.


Third, I love a framed chalkboard or fabric covered bulletin board in a drop zone. It’s the perfect place to leave notes and messages and the framing makes it a finished piece.

Pro Tip – Nikki Levy

My custom framer calls me a “rebel” when it comes to framing, but all our pieces come out just beautifully. I love using the “equal but opposite” concept. Large, busy pieces of art require small clean frames. Small pieces of art look fantastic with large matting and more ornate frames (whether it be modern, transitional or traditional choose ornate within the styles boundaries). I love to create balance between the art and the frame, and as you know, opposites attract!

Lynn @ MyLuxe

I love how the distressed look of this frame compliments the image of a South African township scene. The color pop of reds in the picture looks great against the muted gray frame!

Kathryn Marsh, IDS Professional

Every room or space will require different framing solutions. Variations in size, color, and composition of both frame and artwork, need to be addressed to get the best results. For example, a passage or hallway may lack adequate lighting and visual interest. Creating a gallery wall using mirrored frames helps to give the illusion of more space and reflect light.

Pro Tip – Janice Attia

I believe that choosing the right frame is as important as choosing the right piece of art. Framing is not just saying lets have a thick bold black frame because it looks nice. Selecting the right frame implies putting it in context with the design and the art, it is the “staple” that will put together this two elements in an harmonic way. Textures, colors and materials play a very important role, as I said, it is important for it to be in context but also its very important to highlight the art without disturbing it.

Angela Reynolds, Interior Designer


Decide what is the purpose and home much punch the frame will add to the room? Is it to Blend(low), highlight or statement (High).


Blend: Frame above the  bench is to blend and disappear. The sconces and the artwork are already making a giant statement. A frame with bravado would have been overkill.


Highlight:  The frame above the fireplace was meant to highlight the photography and compliment the andirons in the fireplace. It makes a nice balanced statement


Statement: This frame around this mirror. Is the big design statement. The console and the accessories bow to the bold lines and negative space of the frame design.

Pro Tip – Cathy Sands

The frame should complement and add to the artwork. Don’t be concerned that the frames are all the same. Art should stand on its own and the right frame can elevate your piece. Now if you have several pieces from the same artist or if your look is very clean then I would go with the same frame but my preference is to flatter each individual piece and create a collected look.

Gloria Hernando @ kis Interior Design

As an interior designer, my #1 tip for getting the most out of picture framing is to select a material and frame that compliments the style of the room in which the art will be located. I specialize in contemporary design and prefer selecting simple, neutral frames in finishes such as black, white, and metal that allow the artwork to truly stand out.

Tiffany Hinton @ Lola Interiors

Framing can make a huge impact – it can make a cheap piece of art look expensive and visa versa. But the frame shouldn’t be the focal point. Should complement but not overpower the art. Less is more, in my opinion. Let the art speak. Stick to a simple frame, and in a grouping, I prefer that the frames match: it’s a clean way to make a huge impact! In a recent job, the client had a huge collection of architectural photos she took during her travels through Europe. But, instead of the typical elevation photo, she took pictures of the ceilings! We created a focal point wall with these photos using simple black frames, and we love how it turned out!

Pro Tip – Mark Dalton

Artwork in any space can be the most prominent item when you capture a view of the room. If the artwork is not right, it will throw off the entire look of the space. Whenever you are placing multiple pieces on a wall, there is one important rule; one item needs to stay consistent to pull the look together. The frames should all be the same color, same size or the same frame.

Michaela Mildenhall @ Pargy & Alice Palace Design

As an interiors writer and designer of children’s prints, I’m a big fan of using prints, photos and artwork to make a nursery special. I’m really loving the contemporary new look of today’s nurseries with colorways containing gray, subtle pastel colors and black. As this print is very cutesy-pie and retro, I wanted an image that had a clean modern feel – I love the fact the picture and frame isn’t hung on a wall, and is surrounded by carefully curated objects, punctuated by the freshness and greenery of the pot plant.

Martyn White @ Martyn White Designs

I am quite contemporary when it comes to the framing of artwork. I feel that it is important to have artworks framed but in a way that they do not detract from the art itself. Framing not only completes the design, it connects the artwork to the room in which it is being displayed. I love this black and gold frame as it is immediately noticeable after you view the artwork, with its color highlighting tones within the room.

Mark Tremblay @ Marc-Michaels Interior Design

When you have a large scale wall I would either do a collection of small pieces or a couple large scale prints. Over-scaling the matte on a print will help it feel more substantial and give some weight to a large wall. All framed art does not need to match in a collection. Mixing black and white frames can make a cool high-contrast statement.

Sophie Howard @ Sophie Howard Interiors

Photographs and images add a personal touch to your spaces, they evoke emotions and portray memories that truly make a room feel special. I love the way the frames have been laid out in this image. Picture rails are a fab way to get started as they are so flexible and allow you to swap out frames easily. Mix and match frame size and color and add books and ornaments for a real styled look. I also love the inky background, it makes the whole gallery wall feel more like a feature, it’s perfect!

Pro Tip – Gretchen Mannion

Just how a home’s architecture must lead the interior design, so must a painting’s period and style lead your frame selection! The artwork should be able to move to any space in a home. In other words, the framed piece should be able to stand on its own. After all, art should not be purchased to match the decor, but must truly speak to the homeowner!

Jennifer Lanning @ Total Home Interiors

Our #1 tip for framing is to frame for the picture not necessarily for the room. As designers, we have to be cautious when customizing our client’s images. Although we want them to work within our design we also need to be aware that the client may decide to move the piece to another room at some point. We have to find the balance that will work with the overall design as well as with the image itself. If it doesn’t work outside of the design then you’re not doing the image itself the justice it deserves. In the example, we selected a frame and liner that not only works with the image itself but it also compliments the space in which it hangs.

Rafaela Simoes @ 2id Interiors

When hanging your artwork, or framed poster/ picture on the wall, you should stand a bit far apart from the wall and measure your eye level height straight on to the wall, I usually use a laser tool. Obviously, you should consider an average person height, in case you are too short or too tall. The center of your artwork should always be at your eye level, it doesn’t matter how big/small the artwork is.


People have tendency to hang pictures/artwork way higher than it should be. To me that is a major mistake!!!

Pro Tip – Tania Christensen

Getting the most of Picture Framing, I guess my response is what are you framing? Is it an original piece of artwork? what medium is it: watercolor, oil on canvas, pastel, acrylic, or is it a photograph, maybe a drawing or a two-dimensional piece? All of these mediums have different types of frames and recommendations…

Then I would ask you: how is the décor of the environment you are going to place this piece? Is it modern? traditional? a child room? an office? Depending of the décor and the place I would suggest a different frame…


Another question I would ask is: where you are going to hang the piece:the dimensions of the wall, if the wall is very large and my piece too small, there is ways to frame the piece bigger so that the wall and the piece looks proportionate.


And lastly, I would also inquire if you are going to hang other things next to it or not, does the natural light hits this wall (original pieces, specially watercolors get color discolorations w/ the natural light so you need to use a special glass, etc)

Perla Lichi @ Perla Lichi Design

Picture frames in your home should first and foremost complement the artwork. Frames should either blend with or provide a complementary contrast to the décor. Black lacquer frames in this contemporary hi-rise designed with an Oriental theme, for example, complement the artwork within and blend perfectly with the moldings in the mirrored hallway opposite the foyer. Touches of gold bring out gold tones used elsewhere—on walls, in artwork, in floor medallion. Quality picture frames make a huge difference so always work with a reputable framer. (Image Credit: Dan Forer)

Barbara Krai @ Barbara Krai Interior Design

Frame your work of art to beautifully enhance the piece. This is your only consideration. Do not get distracted thinking about the rest of the room. If the frame works with the art, and the art works in the room, then the frame will work in the room

Viviana Monari @ ID design for all

Either if you are a classic and symmetric person or loves innovative ideas and movement, framing moments and places is always a must in every home. Frames tell a story, describe personalities and give and incredible personal touch to every project.

Mixing and matching sometimes can get a little tricky for amateurs so having professional advice and the service done by a reliable framing company is absolutely worth the investment.

Elizabeth Hall @ Elizabeth Hall Designs

My #1 tip for getting the most out of picture framing would be to make sure that the frame coordinates with both the art and the decor of the space. The frame essentially becomes a piece of the art and should help the piece truly shine and stand out.

Pro Tip – Annie Goldman

Picture framing is just as important to the interior decor as art itself. When choosing a custom framing option, I reference the metals used in the hardware and lighting as well as any wood furniture and architectural details so that the art looks cohesive in the interior environment.

David Miranda @ Dida Home

When framing a picture in a home, we always think Scale, Palette, Style. The scale of the frame and image/art should be proportional, and the colors, materials or design shouldn’t clash. Identify what frame fits well with your image or art piece, as certain pieces call for a rustic frame, others for a baroque frame, and others for a more modern/minimalistic frame.

When selecting a frame for a piece of art or photograph, always consider whether you want the frame or art piece to be the focal point. This can at times be a difficult decision to make but is also a good opportunity to play around. It is also important not to see art or a famous photograph for its “Name” but mainly for what it represents to YOU.

Simply put, putting an eccentric and over-the-top frame to a “Hirst” piece is just as valuable as framing a beautiful piece of art created by your 2-year-old nephew in an elegant white on white museum frame.

Hopefully creating a striking photo wall or art display in your own home is now within your grasp and your brain is bursting with ideas to soon turn into reality. No matter the size of the wall, there is endless picture framing ideas to achieve the look you are dreaming of. Now it’s just time to get framing!

Cris Sweeny| November 1, 2016